Learn how to send emails for free using Sendinblue in Laravel PHP
Notice: We've changed the service to Sendgrid.
Laravel provides many methods to send emails. You may use a plain PHP method to send emails, or you may use some email service providers such as Sendgrid, Mandrill, Amazon SES, etc.

Note: if you're not using Laravel, you can still use Sendgrid to send up to 9300 emails/month for free!
To send emails on a production server, simply edit the mail.php configuration file, which is placed in the config directory.
Here is the file without comments:
return [

    'driver' => env('MAIL_DRIVER', 'smtp'),

    'host' => env('MAIL_HOST', 'smtp.mailgun.org'),

    'port' => env('MAIL_PORT', 587),

    'from' => [
    'address' => env('MAIL_FROM_ADDRESS', '[email protected]'),
    'name' => env('MAIL_FROM_NAME', 'Example'),
     ],

    'encryption' => env('MAIL_ENCRYPTION', 'tls'),

    'username' => env('MAIL_USERNAME'),

    'password' => env('MAIL_PASSWORD'),

    'sendmail' => '/usr/sbin/sendmail -bs',

    'markdown' => [
    'theme' => 'default',

    'paths' => [
        resource_path('views/vendor/mail'),
    ],
],
];
To send emails on a local development server (Homestead), simply edit the .env file.
MAIL_DRIVER=mail
MAIL_HOST=mailtrap.io
MAIL_PORT=2525
MAIL_USERNAME=null
MAIL_PASSWORD=null
MAIL_ENCRYPTION=null
As usual, you may learn how to use Mailgun, Mandrill and SES drivers at the official docs:
https://laravel.com/docs/master/mail
Because working on Homestead, we will learn how to send emails on Homestead using Sendgrid for FREE!!!!!
Sending emails using Sendgrid
Go to Sendgrid, register a new account (free):
Sendgrid website - You can click here to register and learn more about Sendgrid

When your account is activated, edit the .env file:
MAIL_DRIVER=smtp
MAIL_HOST=smtp-relay.sendinblue.com
MAIL_PORT=587
MAIL_USERNAME=yourSendgridUsername
MAIL_PASSWORD=yourPassword
Note: If you're sending emails on a production server, be sure to edit the mail.php file
Good job! You're now ready to send emails using Sendgrid!
Sending a test email
To send a test email, open web.php file and add this route:
Route::get('sendemail', function () {

    $data = array(
        'name' => "Learning Laravel",
    );

    Mail::send('emails.welcome', $data, function ($message) {

        $message->from('[email protected]', 'Learning Laravel');

        $message->to('[email protected]')->subject('Learning Laravel test email');

    });

    return "Your email has been sent successfully";

});
As you see, we use the send method on the Mail facade. There are three arguments:
-
The name of the view that we use to send emails.
-
An array of data that we want to pass to the email.
-
A closure that we can use to customize our email subjects, sender, recipients, etc.
When you visit http://homestead.app/sendemail, Laravel will try to send an email. If the email is sent successfully, Laravel will display a message.
Note: Be sure to replace [email protected] with your real email address.
Finally, we don't have the welcome.blade.php view yet, let's create it and put it in the emails directory.
views/emails/welcome.blade.php
<!DOCTYPE html>
<html lang="en-US">
<head>
    <meta charset="utf-8">
</head>
<body>
<h2>Learning Laravel!</h2>

<div>
    Welcome to {!! $name !!} website!
</div>

</body>
</html>
Because we've passed an array containing the $name key in the above route, we could display the name within this welcome view using:
{!! $name !!}or
<?php echo $name ?>Done! Now go to http://homestead.test/sendemail, you should see:
Note: Replace homestead.test with your app address if the address is different.
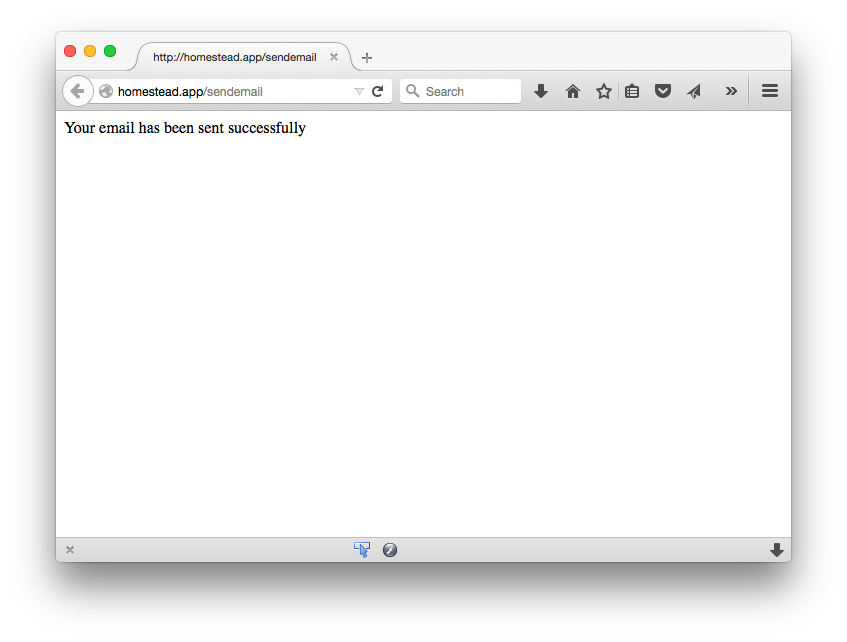
Check your inbox, you should receive a new email!
Feel free to customize your email address, recipients, subjects, etc.
Note: This is a Chapter 3's section of Learning Laravel 5 book. You can read the book for free here: https://learninglaravel.net/laravelbook
This post is submitted by our members. Submit a new post.
Tags: Tutorials Laravel 5 Laravel 5.5 Laravel 5.4 Laravel 5.3 Laravel 5.6 Beginner Laravel 5.1 Laravel 5.2 Tips Tricks News